Prior to getting started
- Get in touch with our business development team to set up your credentials. This step allows us to activate the payment methods you intend to process, customize payment capture preferences, and configure any desired 3D Secure settings.
- Configure a webhook to receive notifications upon payment approval, ensuring a seamless continuation of the pay-in flow.
- Follow our guide on the basic auth and signature calculation required when integrating with our APIs.
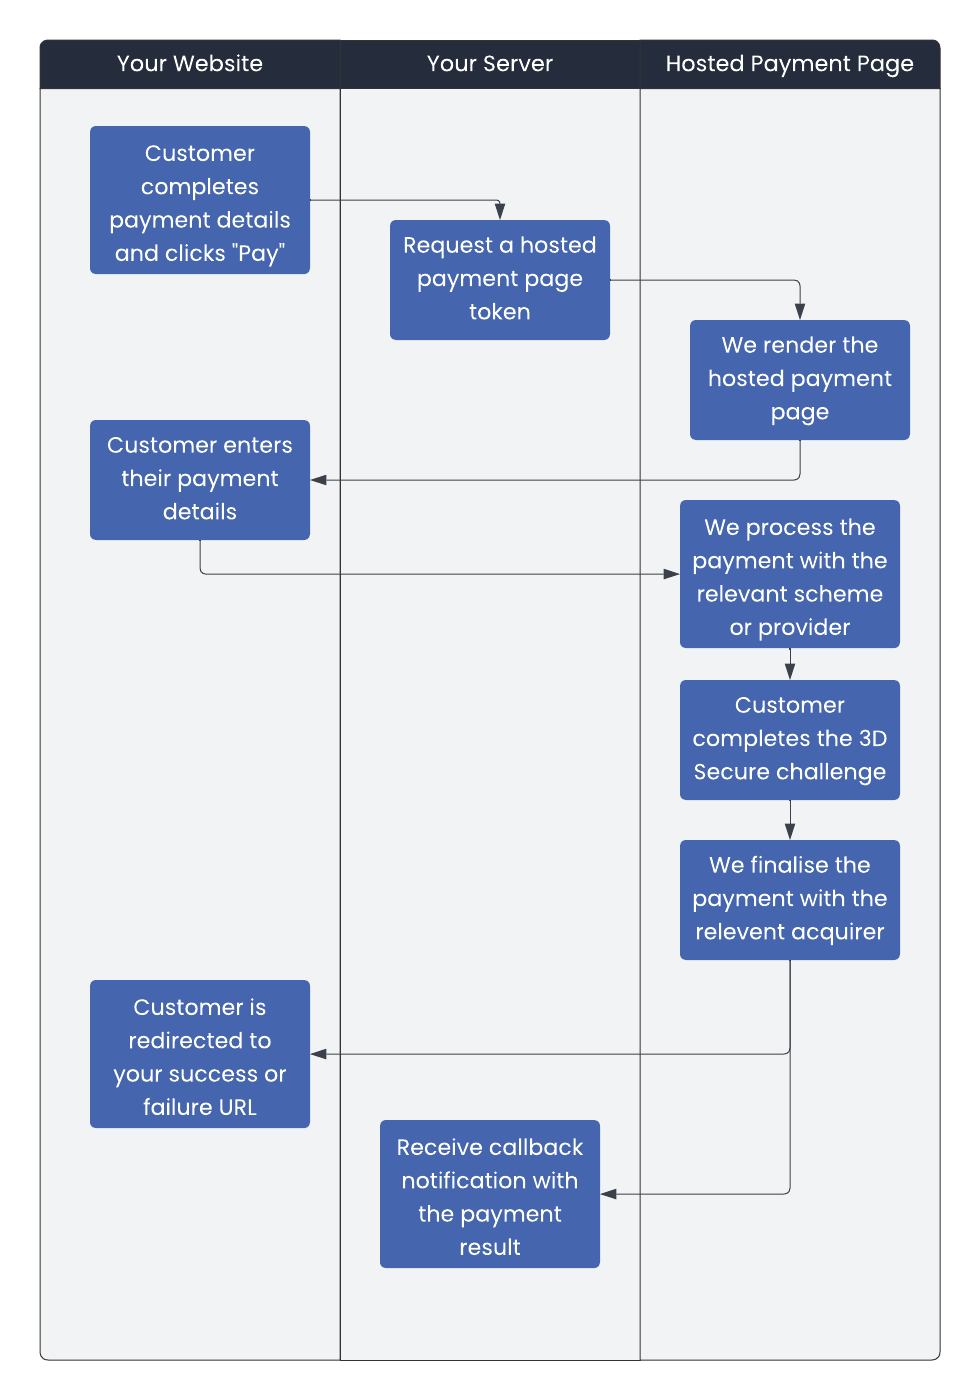
The following flowchart illustrates the step-by-step process of a payment utilising the Hosted Payment Page:
Create a Hosted Payment Page
Step 1. Create a Hosted Payment Page Token
To finalise a customer purchase on your website, initiate a Hosted Payment Page (HPP) session by generating a hosted payment page token. Include the relevant transaction details in the payload, such as the transaction type, amount, and currency. Please note that certain acquirers may require additional customer information. You can find the required fields for each acquirer here.
Additionally, ensure you provide the redirect URL in the payload, which specifies where the user will be taken after the payment is completed.
Create an HPP Payment Token by calling:
The user is to be redirected the URL provided in the response to complete the payment.
Alternative Payment Methods
Each payment method has specific mandatory and optional fields for request submissions. Explore the required fields for each payment method in the APM specifications or refer to our API reference. When selecting the APM from the dropdown in the payment request, the corresponding mandatory fields will be displayed in the payload.
The hosted payment page can be embedded as an iframe or a full redirect.
You can view our API reference here.
Request Sample
{
    "TransactionType": "PURC",
    "Amount": "10.10",
    "Currency": "EUR",
    "IsTest": true,
    "OrderReference": "67556",
    "Language": "en",
    "RedirectionURL":    "https://www.yourURLhere.com/Redirect",
    "FailRedirectionURL": "https://www.yourURLhere.com/failedRedirect",
    "CallBackURL": "https://www.yourURLhere.com/callbackURL",
    "UniqueReference": "e516b8f4-8b5c-4290-a2b0-b74b55239312",
    "Client": {
        "Email": "joe.bloggs@testjb.com",
        "ClientAccount": "CliAcc01002",
        "FirstName": "Frictionless",
        "LastName": "Processed",
        "Country": "MLT",
        "MobileNo": "00441234567",
        "Street": "High Street",
        "City": "Marsa",
        "ZIPCode": "BGGC1234",
        "State": "UK",
        "DateOfBirth": "2924-12-31",
        "IPAddress": "214.21.134.79"
    },
    "UDF": {
        "text": "text",
    },
    "Configuration": {
        "Profile": "HPP-Profile",
        "CardHolderNameEdit": "true",
        "ShowSavedCards": "0"
    }
}
| Field | Description |
|---|---|
| Transaction Type | You can view details on the supported transaction types here. |
| Order Reference | This is your unique transaction identifier, which can be used for reconciliation purposes. It is highly recommended that each identifier be unique to each transaction. |
| Language | You can view a list of supported languages here. |
| RedirectionURL | You can specify the URLs for redirection after a payment attempt, along with the callback URL for webhook notifications. This ensures you receive updates on the payment status. |
| Client | A model that captures client information. Required fields are outlined in our API reference, but the provider may need additional details, which are specified here for APMs or here for Acquirers. |
| UDF | User-Defined Data. Any additional information you want to be passed back to you after the payment is completed. |
| Configuration | This model captures the hosted payment page UI / UX customisation parameters. You can find the various parameters defined here. |
You can view more details on the above in our API Reference.
Step 2. Redirect your customer
Redirect the customer to the redirectURL provided in the response to the above create HPP token.
Response Sample
{
    "pspid": 840675,
    "token": "7801ad56c2d04db8a9975d161a2e93ef",
    "redirectUrl": "https://payments.dev.apspglobal.com/merchanttools/api/Redirect/Loader?token=7801ad56c2d04db8a9975d161a2e93ef",
    "status": "PENDING",
    "isSuccess": true,
    "errorMessage": null
}
| Field | Description |
|---|---|
| PSPID | The field contains the Gateway Transaction ID. |
| Token | Represents the instance of the HPP redirect. ( This is different from a card token) |
| RedirectURL | Captures the Redirect URL of the HPP. |
| Status | Indicates the current payment status. |
| IsSuccess | Specifies whether the transaction was succesful or not. |
| ErrorMessage | Contains any error messages received from the acquirer. |
You can view more details on the above in our API Reference.
You can see a screenshot of our payment page here.
The redirect URL will remain active for a duration of 2 minutes from the moment of creation.
In some regions or with specific card issuers, 3D Secure authentication is mandatory for card payments. No additional integration is needed; our payment page handles the entire process.
Step 3: Receive Callback Notification for Payment Request
After your customer completes the payment, they will be redirected to the URL provided in the payload from Step 1. If the payment is successful, the transaction response status will be 'Processed'.
To proceed with the payment flow, make sure to listen for Callback Notifications. These notifications will inform you when a payment has been successfully completed. The payment result will be sent to the callbackURL specified in the original request. For detailed information, refer to our callback notification guide.
You can view a sample notification below.
{
    "AttemptNumber": 1,
    "SentDateTime": 1721043745,
    "TransactionToken": "8cdafce8caab497ab65de896a2fb2df1",
    "OrderReference": "GPY14656521",
    "Status": "Processed",
    "AuthCode": "854318",
    "CardInput": true,
    "PspId": "334564",
    "Currency": "EUR",
    "Amount": "13.29",
    "CardNumber": "445951******3714",
    "CardExpiry": "07/2028",
    "CardHolderName": "Joe Smith",
    "CardCountry": "MLT",
    "CardType": "VISA",
    "CardToken": "e66ae1c4-30da-4b4d-85fd-aabc37f19bc2",
    "Acquirer": "BOVPAYON",
    "Email": "test@mailinator.com",
    "UniqueReference": "GP5335594395690",
    "ClientAccount": "",
    "Is3DS": true,
}
Polling Option (Fallback)
If the payment notification is unavailable or delayed, you can manually retrieve the payment status by polling the Get Payment Response API after a suitable interval. The endpoint for this API is provided below.
To enable one-click payments or streamline future purchases, customers can request to save their card details on your website during a Cardholder-Initiated Transaction (CIT). The callback notification contains a cardtoken which can be securely stored on your side and can be reused for future purchases for both CIT or Merchant-Initiated Transactions (MIT).
You will require approval from your acquirer to process Merchant-Initiatied Transactions (MIT) since 3DS is usually not required for these type of transactions.
Click here for a detailed explanation on how to use stored card payments.
Testing your integration
There is only one API Base URL:
API BaseUrl: https://payments.apcopay.tech/merchanttools
To perform a test transaction, set the IsTest parameter to true in the payload. For more detailed instructions on how to test, please refer to this page.