Apcopay's plugin integrates with WHMCS, enabling effortless card payment processing, streamlining payment procedures for web hosting businesses.
This article will guide you on how to configure the WHMCS Apcopay plugin. Kindly download WHMCS module from here.
It is possible to support both deposits and refunds using our plugin.
Before attempting to integrate with WHMCS, ensure that you are onboarded with Apcopay. Contact our support team to assist you in this regard.
You will need access to the WHMCS portal as well as merchant credentials as provided by our support team.
One-time Setup
| Step | Description |
|---|---|
| Step 1. Installing the module | To install the new module, upload the provided files in the general information page to /modules/gateways folder to your WHMCS installation. Folder - apcopay - the whole folder File - apcopay.php The file in the folder call back must be uploaded to /modules/gateways/callback folder. Do not put the whole folder just the file called apocpay.php Once these are uploaded, navigate to the admin area of your WHMCS and go to "setup > Payments > Payment Gateways" to activate and configure your new module. |
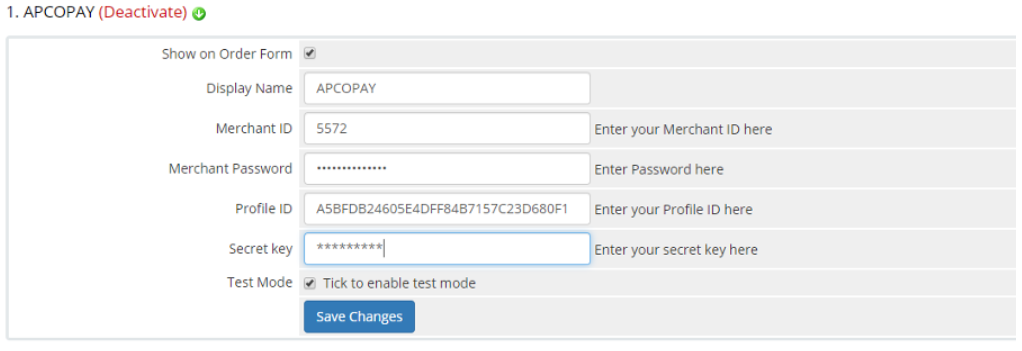
| Step 2. Configure settings on WHCMS | Go to "All Payment Gateways" and you should have "Apcopay" listed. Click on it and you should be redirected to configure your settings. Fill in the below details Show on Order Form - This should be activated for the invoices to be able to be paid by the module. Display Name - To be shown when the user selects to pay. Merchant ID - This can be found in the Apcopay welcome email. Merchant Password - This can be found in the Apcopay welcome email. Profile ID - This can be found in the Apcopay welcome email. Secret Key - This can be found in the Apcopay welcome email. Test Mode * - Select to be able to perform test transactions on Apcopay Gateway. |
*Make sure to switch this off when your website is live.
An example of a populated form can be seen below:
Creating an invoice to be paid via Apcopay
No additional setup or configuration is necessary. Moving forward, any invoices issued will feature "Apcopay" as a payment option. Users can simply choose "Pay Now," which will redirect them to our hosted payment page.
Once the payment is successfully processed, the invoice status will be updated to "paid." Additionally, in the admin panel, the order's Payment Status will reflect either "complete" for active orders or "No Invoice Due" for pending orders. Please note that pending orders should be manually changed to active in the WHMCS admin panel.
Test Card Details:
For test transactions, use card 4444444444444444
Processing Refunds
Processing a refund is simple. Select the order from the "admin panel". Click on "cancel and refund". The response of the refund should appear on screen. The payment status will be updated to "refunded".
Errors
In case of any errors, kindly forward gateway logs to Apcopay Support to be able to assist you with your issues.
These can be found from the admin panel. Billing > Gateway log